Crimping pliers or Magic Crimping Pliers
2 pair chain-nosed pliers or 2 pair of flat-nosed pliers, or 1 of each
Flush cutters
Masking tape, alligator clips, or bead stoppers
Bead board (optional)
Measuring tape
Bead List:
Note about bead amounts - Depending on the children's names, and the size of the mommy's wrist, you may need more or fewer.
sterling silver 4.5mm letter beads
(for the name or names of the children)
5810 5mm Swarovski Pearl White
(same amount as you have letters +2)
6mm aquamarine chalcedony faceted rondelles (3)
small Bali bumpy spacer beads (8)
6mm faceted bicone swarovski crystal faceted bicone beads
(2 of each birthstone color)
6mm sterling silver seamless round beads (2)
Findings:
Sterling silver twisted 6.5 mm jump rings
2mm sterling silver crimp tubes size 2 (6)
Sterling silver Mom heart charm
Sterling silver puffed heart charm
Sterling silver toggle clasp
.018" silver plated 19 strand nylon coated beading wire
French wire, size medium
Stringing Your Mother Day Bracelet
Step 1: Line up your beads
Start by lining up your beads on your bead board or on masking tape facing sticky side up. This makes it easy to move them around and rearrange them if you need to.
Step 2: Prepare your Beading Wire
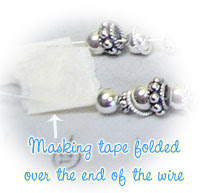
Cut your nylon coated beading wire about 2.5 inches longer than the person's wrist size. Put a piece of masking tape, an alligator clip, or a bead stopper at the end of your stringing wire.
Step 3: String, Look, Rearrange, Fuss...
Don't finish either end yet. String your beads onto your wire. It's OK to string and restring until you're happy with the design (I usually have to rearrange a few times until I like the look).
Here's the design I finally decided on:
~
Step 4: Measure
Put masking tape or a bead stopper on the open end of beading wire. Measure your strung beads. Make sure that they are all pushed together. Your string of beads needs to measure the same as your wrist measurement less about 1/8th of an inch. Add or remove beads from the ends as necessary.
Step 5: Crimping one end of the bracelet
Call me paranoid, but I usually double or even triple crimp my bracelets to make extra sure they don't come apart. This bracelet is triple crimped on each end.
Take your tape off one end and string a crimp tube, a sterling 6mm bead, and 2 more crimp tubes.
Form a loop at the end of your bracelet by stringing a 1/2" piece of french wire onto your beading wire, then stringing your beading wire back through the 2 crimp tubes, the sterling round bead, and the 3rd crimp tube, and the next bead in line too.
French Wire is a coil of very fine wire that fits over your beading wire. I use it on the toggle end.
Tighten up everything nice and snug by pushing your beads and crimp tubes close together. Crimp each tube.
Take the remaining piece of tape off your bracelet.
String 1 crimp tube, 1 sterling round, and your last 2 crimp tubes onto your unfinished bracelet end. String the clasp. String the end of your beading wire back through the sterling bead and crimp tubes tighten the beading wire.
Crimp your crimp tubes.
I like to use my Magic Crimping pliers (to see what these pliers look like, see the lefthand pic below) because it turns my crimp tubes into little round balls that look like beads. You can use crimping pliers to crimp and fold the tube, or squash the crimp tubes flat with your pliers instead.
Lefthand picture: This picture shows a different clasp, but I wanted to show you how your crimp tubes and beading wire should look in this step.
Righthand picture: Legend: C=crimp tube, SR=sterling round (obviously, these tube are already crimped) See how my crimp tubes look like liitle beads?
Step 6: Attach the Toggle Bar
Your toggle bar usually has a jump ring attached to it. Use it to attach the toggle bar to your french wired loop.
Step 7: Trim your nylon beading wire close with flush cutters.
Step 8: Attach Your Charms
Your charms should come with jump rings attached. Use them to attach the charms to the toggle clasp end of your bracelet (either to the loop of the clasp, or around the beaded part of the bracelet)
Step 9: Finish it Off and Pack it Up
Admire your work, and wear it around town for a day to make sure it won't fall apart or fall off. Finally, if all is well, wrap it nicely in a pretty box for your lucky friend or mom.
Don't forget to write a nice little card explaining what materials you used, and about the birthstone crystals. Brag a little! Make sure your gift recipient knows how much time and thought you put into the gift!
Variations
This bracelet could be made lots of different ways. Here are some ideas:
Make a 2 or 3 strand bracelet with a child's name on each strand.
Use sterling silver rounds instead of the pearls
Make matching mother and daughter bracelets.
Make a Grandmother bracelet with "GRANDMA" in letter beads, and all the birthstone crystals of her grandchildren.


